Automate Windows 10 from your Android device
In this guide you're going to learn how to turn on and control your PC from your Android smartphone (no root required). I will go over the process step by step.
Before we get started though, I have to warn you that the responsibility for any damages caused by following this guide is only yours. Please keep in mind that this will introduce a second way to access the computer in question.
What will you need
This list is rather short and straight forward, you will only need:- An Android device
- A computer with Windows 10 and a Wake-on-LAN capability
That's it, well basically...
Step 1: Installing the apps
The only two apps you'll need are going to be Automate and ConnectBot and they're both free!
You can find the play store link for Automate here.
And the link for ConnectBot here.
Step 2: Configuring Wake-on-LAN
If your computer allows it, you can boot it up by sending it a special Wake-on-LAN packet. The packet contains your computer's MAC address, which will be important later.To enable this, you will need to go into your computer's BIOS settings and maybe even configure your network adapter in the device manager. I got all that information from a single source, there they go into more depth about WoL and how to enable it on different operating systems.
To summarize for Windows:
First you'll need to enable WoL in your BIOS which can be tricky since your BIOS UI probably differs from mine. Restart your computer and in the loading screen press either: DEL, F1, F9, F10, F12 or whatever your specific motherboard uses. Now the tricky part. Somewhere in the BIOS menu there will be an option to turn on Wake-on-LAN. Where? I can't say for you but for me it was under Settings\Advanced\Wake Up Event Setup\Resume By PCI-E Device -> Enabled
With BIOS configured it's time to check the Network Adapter in Windows Go into your Device Manager: press "windows key"+"x" and then press "m", there you will see a section called "Network adapters". Right click your network adapter (for me it was the one with "PCIe" in name) and click on properties. Go to "Advanced" and scroll down until you find "Wake on Magic Packet", make sure it's "Enabled". Now go to "Power Management" and tick the "Allow this device to wake the computer" together with "Only allow a magic packet to wake the computer". Click OK and you should be done.
To troubleshoot your WoL, because who are we kidding, nothing ever goes smoothly, you can use this tool from depicus:
https://www.depicus.com/wake-on-lan/wake-on-lan-monitor
It will let you see if the magic packet is actually being received. If it's not then there might be a problem with your
router not propagating the WoL packet through your local network.
Get your MAC address
Lastly you will need your PC's MAC address. Open command prompt and type in:
ipconfig /allYou will get something similar to this:
Windows IP Configuration

   Host Name . . . . . . . . . . . . : DESKTOP-XXXXXX
   Primary Dns Suffix  . . . . . . . :
   Node Type . . . . . . . . . . . . : Hybrid
   IP Routing Enabled. . . . . . . . : No
   WINS Proxy Enabled. . . . . . . . : No
   DNS Suffix Search List. . . . . . : home

Ethernet adapter Ethernet:

   Connection-specific DNS Suffix  . : home
   Description . . . . . . . . . . . : Description of your controller
   Physical Address. . . . . . . . . : 00-11-22-AA-BB-CC
   DHCP Enabled. . . . . . . . . . . : Yes
   Autoconfiguration Enabled . . . . : Yes
   IPv6 Address. . . . . . . . . . . : your IPv6 address
    .
    .
    .
Your MAC address is the "Physical Address". You will need it in the next step.
Step 3: Automate Wake-on-LAN
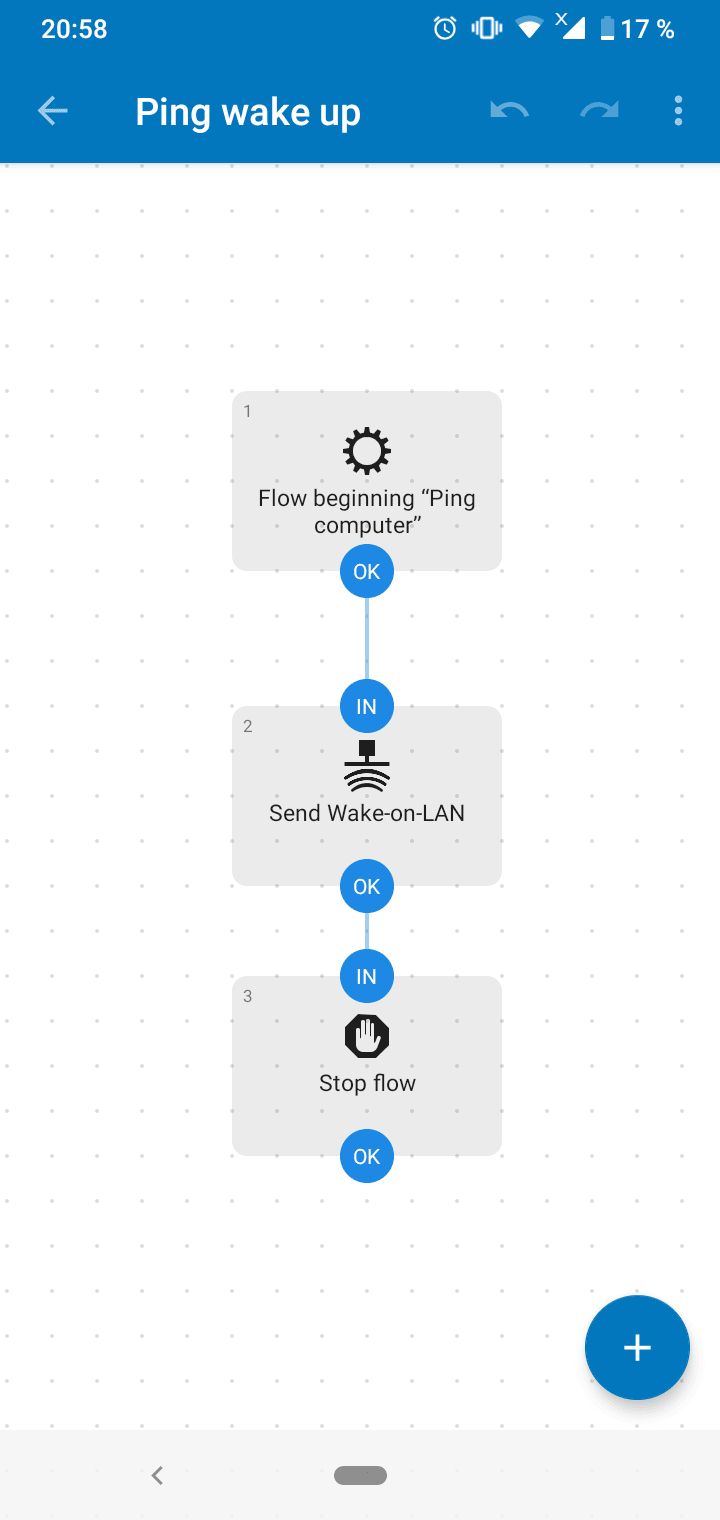
Conveniently Automate can send a Wake-on-LAN magic packet.Open the app and create the following flow.
In the "Send Wake-on-LAN" block choose either port 7 or 9 and input your MAC address.
You can now boot your computer from as far as your wifi can reach.
Step 4: Windows 10 OpenSSH
I've gone through many sources on this one. But the one with the most concise information has to be this.
Once again to summarize:
- Go to "Settings" -> "Apps" -> "Apps & features"
- Once there, click on "Optional features" then "Add a feature"
- From the list select "OpenSSH Server" and install it
- Go to c:\windows\system32\Openssh and type "cmd" into the explorer window.
- Type ssh-keygen -A in the command prompt to generate the ssh key.
Now, I have gone the more complicated route but apparently since then Microsoft has released a tutorial.
- Open PowerShell and type in:
Install-Module -Force OpenSSHUtils

Repair-SshdHostKeyPermission -FilePath C:\Windows\System32\OpenSSH\ssh_host_ed25519_key
Ok, you should now have a working SSH server.
Try it out! You can open a connection from Termux for example. Open Termux and type in:
ssh name@host.Where "name" is your user name and "host" is your computers name(or IP address). Once you fill in the password you will have access to the command prompt and from there you can control your computer remotely.
Step 5: ConnectBot SSH keys
I suspect it is because we're trying to send a command from a unix environment to windows but regardless, the command you give to ConnectBot will not pass an "enter" key and so won't execute automatically.Luckily the SSH protocol has a solution. You can assign a command to individual keys and that's precisely what we need to automate turning off the PC. Connect, execute a script and disconnect.
In this case the script is a simple command: "cmd /c shutdown /p"
In ConnectBot create your own public key and send it to your Windows PC.
There go to "Users/YOUR_NAME/.ssh and open authorized_keys for editing.
Put in: command="cmd /c shutdown /p" CONNECTBOT_SSH_KEY
Where CONNECTBOT_SSH_KEY is the key you've generated in ConnectBot.
Step 6: Automate ConnectBot
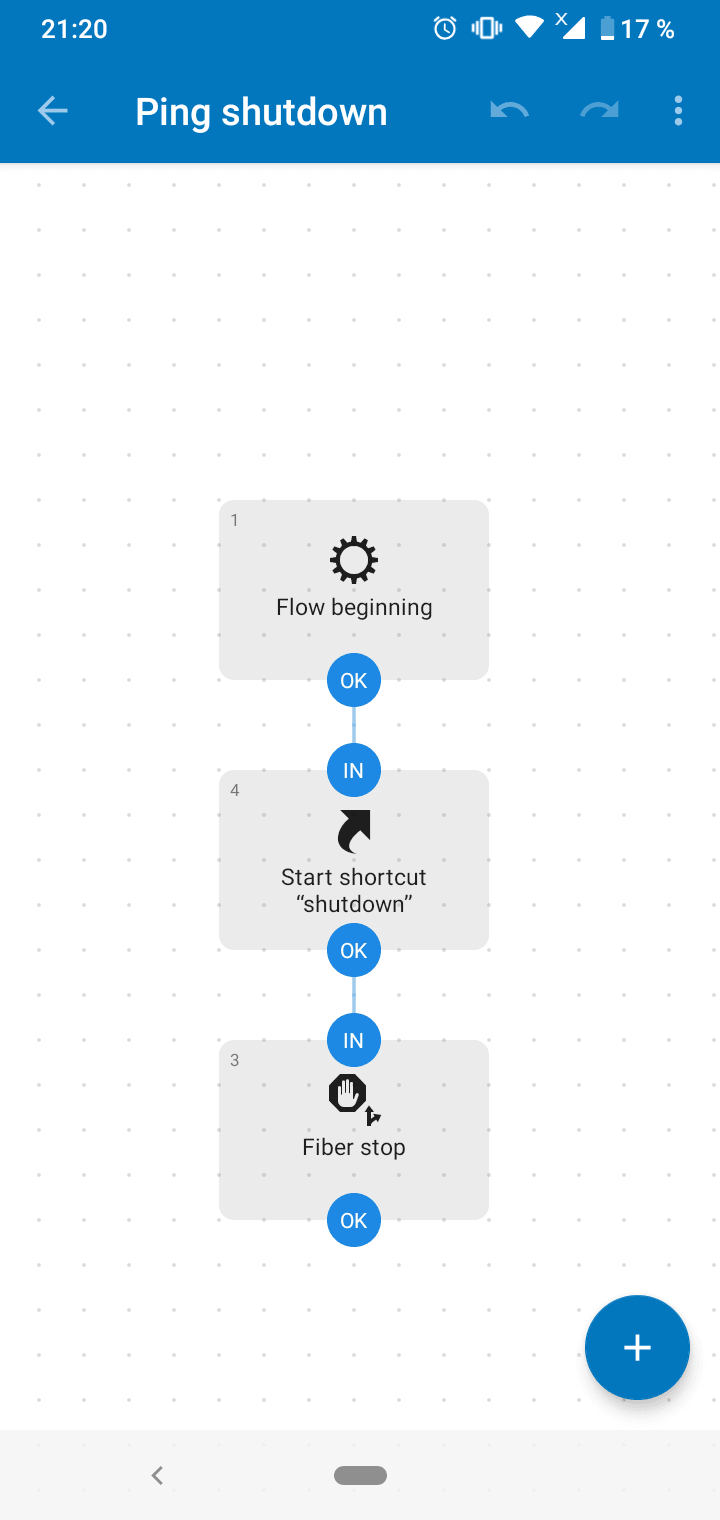
Hopefully the last step.Create the following flow:
In the "Start shortcut" block pick ConnectBot and choose the connection tied to the key that executes shutdown.
Congrats, you have now turned your smartphone into a remote on and off button 🙂
This doesn't even scratch the surface of what you can do with a running SSH connection however. Go wild, your imagination is the limit.


